目錄
- 一.基礎知識:
- 二.DHCP服務器的相關配置:
- 1.查看server的ip
- 2.查看DHCP服務的依賴包:
- 3.安裝DHCP服務:
- 4.進行配置:
- 三.一個配置例子
一.基礎知識:
1.DHCP簡介:
DHCP(Dynamic Host Configuration Protocol��,動態(tài)主機配置協(xié)議)通常被應用在大型的局域網(wǎng)絡環(huán)境中����,主要作用是集中的管理、分配IP地址�����,使網(wǎng)絡環(huán)境中的主機動態(tài)的獲得IP地址、Gateway地址���、DNS服務器地址等信息�,并能夠提升地址的使用率�。
2.DHCP服務器簡介:
DHCP服務器指的是由服務器控制一段IP地址范圍,客戶端登錄服務器時就可以自動獲得服務器分配的IP地址和子網(wǎng)掩碼��。
二.DHCP服務器的相關配置:
今天我們就來做一個DHCP服務器:

我將虛擬機server作為dhcp服務器使用���,利用destop進行測試
為了方便,將server主機名更名為dhcp.server.com,將desktop主機名更名為dhcp.test.com
下來��,我們在dhcp.server.com這臺主機上進行配置:
1.查看server的ip

2.查看DHCP服務的依賴包:

3.安裝DHCP服務:

4.進行配置:
(1)開啟dhcp服務
(2)更改配置文件
cp /usr/share/doc/dhcp-4.2.5/dhcpd.conf.example /etc/dhcp/dhcpd.conf
vim /etc/dhcp/dhcpd.conf
更改以下部分:
7 option domain-name "server.com";
##域名:參見/etc/resolv.conf
8 option domain-name-servers 172.25.10.254;
##指定dns服務器,多臺用逗號隔開�����。
30 subnet 172.25.10.0 netmask 255.255.255.0 {
##指定子網(wǎng)絡及子網(wǎng)掩碼
31 range 172.25.10.10 172.25.10.20;
##指定IP范圍
32 option routers 172.25.10.254;
##指定默認網(wǎng)關
33 }
34#### 刪除27,28行�����,34行及以后
下面是在dns.test.com上所做的配置:
(1)網(wǎng)絡參數(shù)設置:
編輯/etc/sysconfig/network-scripts/ifcfg-eth0
DEVICE=eth0
BOOTPROTO=dhcp
###關鍵部位為dhcp
ONBOOT=yes
(2)重啟網(wǎng)絡:
systemctl restart network
###在本次試驗��,我遇到了如下問題:執(zhí)行該命令報錯,無法通過DHCP服務器獲得ip,解決思路為:DHCP通常是用于局域網(wǎng)內的一個通信協(xié)議���,它主要通過客戶端發(fā)送廣播數(shù)據(jù)包給整個物理網(wǎng)段內的所有主機�,若局域網(wǎng)內有DHCP服務器時�,才會響應客戶端的ip參數(shù)要求。所以DHCP服務器與客戶端應該在同一個物理網(wǎng)段內��。整個DHCP數(shù)據(jù)包在服務器與客戶端間的交互情況如下圖(1):
###所以我猜測是防火墻阻止了數(shù)據(jù)包的傳送
###我采取的解決方法是:
兩臺虛擬機均執(zhí)行命令:
firewall-cmd --permanent --add-service=dhcp
firewall-cmd --reload
查看dhcp是否通行:
firewall-cmd --list-all
重啟虛擬機后問題解決�。

(圖(1)DHCP數(shù)據(jù)包在服務器與客戶端間的交互情況示意)
測試機通過DHCP服務器獲得ip:

(3)將整個網(wǎng)絡重啟之后,如果執(zhí)行的結果找到的正確的DHCP主機���,那么以下幾個文件可能會被修改����。
1.查看/etc/resolv.conf

2.查看路由

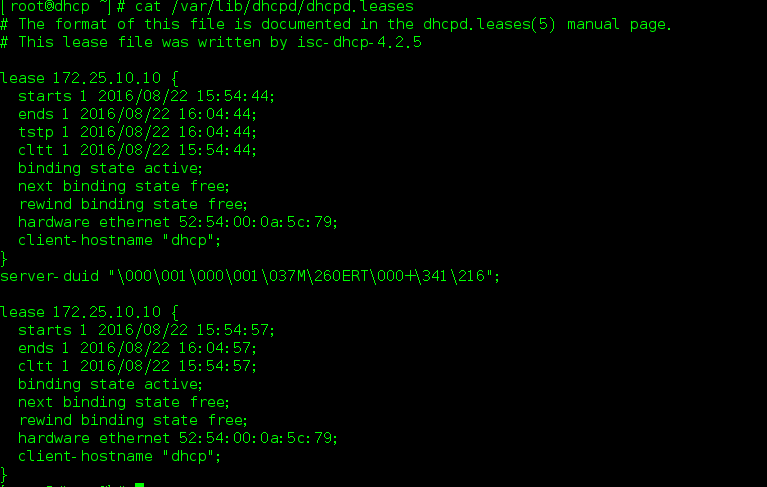
3.查看服務器記錄的DHCP信息cat /var/lib/dhcpd/dhcpd.leases
三.一個配置例子
cat /etc/dhcp/dhcpd.conf
# dhcpd.conf
#
# Sample configuration file for ISC dhcpd
#

# option definitions common to all supported networks...
option domain-name "example.org";
option domain-name-servers 192.168.0.199;

default-lease-time 600;
max-lease-time 7200;

# Use this to enble / disable dynamic dns updates globally.
#ddns-update-style none;

# If this DHCP server is the official DHCP server for the local
# network, the authoritative directive should be uncommented.
#authoritative;

# Use this to send dhcp log messages to a different log file (you also
# have to hack syslog.conf to complete the redirection).
log-facility local7;

# No service will be given on this subnet, but declaring it helps the
# DHCP server to understand the network topology.


# This is a very basic subnet declaration.

subnet 192.168.0.0 netmask 255.255.255.0 {
  range 192.168.0.10 192.168.0.20;
  option routers 192.168.0.199;
}
到此這篇關于Linux實現(xiàn)DHCP服務器的搭建的文章就介紹到這了,更多相關Linux DHCP服務器搭建內容請搜索腳本之家以前的文章或繼續(xù)瀏覽下面的相關文章希望大家以后多多支持腳本之家��!